Monday, May 01, 2006

Halo 3

Yeah Halo 2 is getting old.... And your thinking why you haven't gone pro... I guess I can say better luck in 2007. =)

ClICK HERE to Read The Full Post

Friday, April 21, 2006

Halo Masters Links2

- Also Visit These Other Great Sites - 1 - 2
-------------------------------------------------------------

Last minute hotel room bookings
Great savings on your hotel room reservations, as well as last minute hotel reservations.

Paid Surveys
Get free information and details to more than 500 paid online survey companies that will pay you cash money to take online paid surveys. All of them are free to join!

Poems
Visit our poetry site!... Offers a free poetry newsletter, and stuff for poets.

Downloadable free full games - Full Games Download Center
All kind of free Downloadable games now on this site just for free and for your enterteiment!!!Free games dawnload for all the of people from entire worldAll kind of opinions and sugestions that you want to know are on this site who spokes about

Verizon DSL
Offers information about DSL - Digital Subsriber Line Companies

Media express, multimedia for both veterans and beginners.
We provide software for CD and DVD ripping, audio/video decoding/encoding and converting. We also have various products for PSPs, iPods and MP4 converting.

Free online java and flash games!
Get free java games and fun flash games that you can play for free in your browser.

Maui
Maui is the tropical dream you need, the vacation you want. Find out how each region of Maui is different from the others, search out the best things to do, find out what Maui is famous for, and discover your own corner of the paradise on earth.

Cape Cod
Cape Cod travel guide

PDF Converter
The PDF Forum offers information for people looking to learn more about using PDF.

love poems
Offers love poems and love quotes.


ClICK HERE to Read The Full Post

Sunday, April 09, 2006

Halo 2 Super Jump - Lockout SB5

On this Halo 2 Super Jump we are on the 'Battle Rifle Ramp' right side, you will need to crouch into the side of this structure which the arrow is pointing at. (click images for better views)
Crouch into it for a few seconds while holding forward so you can 'glitch/activate the super jump'. Either slide to the right or jump out and turn to the right.
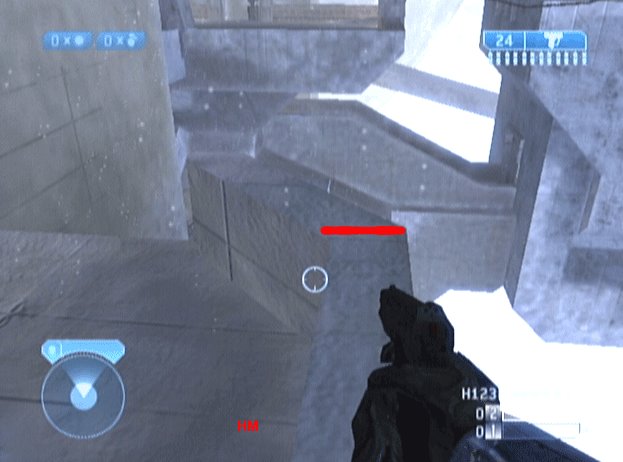
Now carefully jump onto the rail and run on it to the red line shown in the picture, when you get to the red line jump forward. 
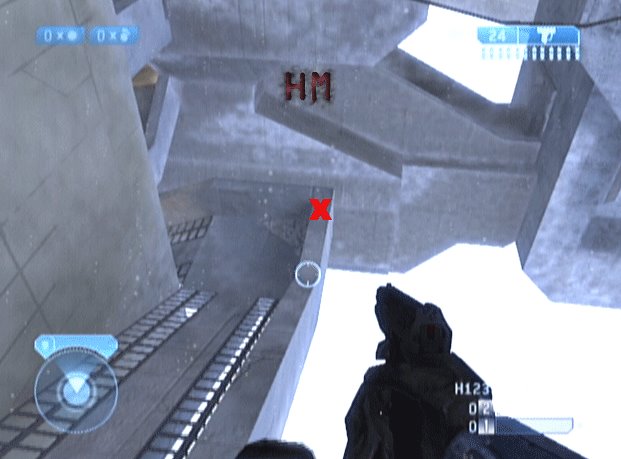
Here we are in the air aiming for the rail with the X, that is where you need to land for this Super Jump.
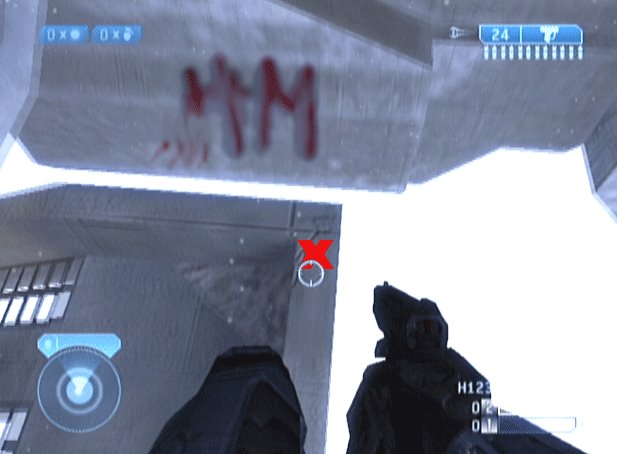
Hit that X and you should super jump. With this Halo 2 Super Jump you can get onto the big structure above the gravity lift, just FLY over to it. That's it n00blets.
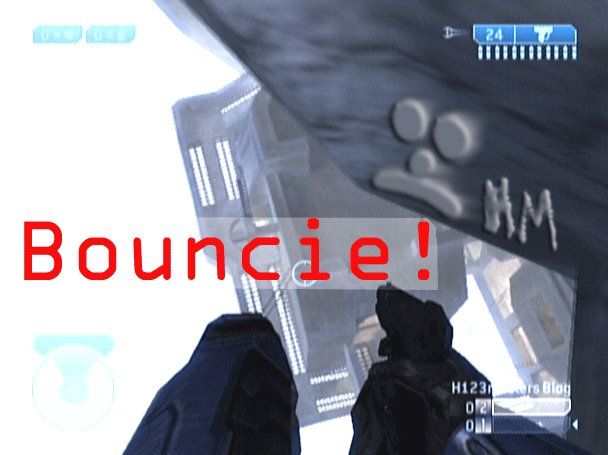
We on top !


ClICK HERE to Read The Full Post

Thursday, March 30, 2006

Halo Masters Links

- Also Visit These Other Great Sites - 1 - 2
-------------------------------------------------------------


poetry contests
offers information about poetry contests online.

Free full cd image games downloadable
A complete resource for free downloadable games, in any format and for every platform. This is where you'll find the game you're looking for.

Online Payday Loan
Find information on sites offering online payday loans for business or fun.

Paid Surveys
paid surveys site reviews and testimonials

Free Small Business Software - Free Ideas For Small Business
Free Small Business Software - Free Ideas For Small Business - Small Business Content Reviews For A Small Business Software Information Free Business Ideas For Buy Or Sell Small Business Software

Shohouyaku Non Pharmaceutical Medicines of Asia
Alternative medicines and healing practices of Asia are a great alternative to pharmaceuticals.

FREE DOWNLOADABLE GAMES All great games free downloadable
DOWMLOADABLE Free all games old game snew games free games kids games adult games fo all people - FREE DOWNLOADABLE GAMES All great games free downloadable Free Games Resources.

Welcome to download games free with cd key !
From us you get the resource of where to download games free with cd key - our resources will point you where you can find for download games with cd key we also offer games news cd key compatibility and games cd key reviews.

Gift Basket Business
Offers a complete business package to help you easily and quickly start your own profitable home-based gift basket business business.

Cleaning
Offer a complete business package to help you easily and quickly start your own profitable home-based cleaning service.

Bed and Breakfast
Offer a complete business package to help you easily and quickly start your own profitable home-based bed and breakfast business.

Catering
Offers a complete business package to help you easily and quickly start your own profitable home-based catering business.

Paid Surveys
Looking for information regarding Paid Surveys and details on the topic of of work at home opportunities? Visit us for advice on paid surveys, mystery shopping, product testing and much much more.

Install Scripts
Need someone to install scripts on your website? CGI & PHP script installation service at affordable prices. Allow me to install scripts on your website, from $19

Old Games Instant Downloadable Free Old GAMES
Downloadable Old Games Free - Here are The OLD GAMES find Whatever you need to download Free Old Games on Old-Games-Instant-Free-Downloadable.comFind the joy of Old Games again and download free samples and play. Free Old Games Resources global.

Runescape
Runescape Money Guide. Instant delivery after payment-$4.95. Get rich on R/S now. Make 80-120k or more an hour easily. Learn from a Runescape Billionaire how to make millions now.

All About Linux Unix - Local DNS - LINUX SERVER SECURITY Local Dns - Server dns - Resolve local dn
About Linux Unix - Local DNS - LINUX SERVER SECURITY Local DNS - Linux server security and Resolving SErver local dns

Free Games Webdirectory Download Games Free Submit Games Websites Free Games Webdirectory
Free Games Webdirectory Free submisions Download Games for Free find your favorite games adn download it Submit your Games Websites for Free Games Webdirectory

Cash Advances
Find information on sites offering quick cash for an emergency, bill payment, or just some good old fashion fun.

Copywriting book
Copywriting ebook - reveals the art of copy writing, and sales manipulation. Become a copywriter and improve your website pitch.


ClICK HERE to Read The Full Post

Sunday, February 26, 2006

SuperBounce4-Lockout-Halo2

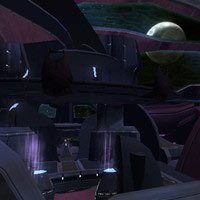
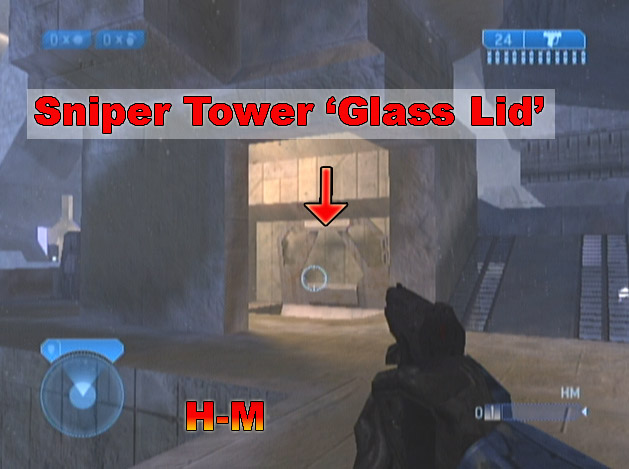
In this Halo 2, Super Jump we will be by the 'Sniper Tower'. There is a opening leading to the room below ('Bottom Sniper' or 'S1'). Right above the opening is a glass lid looking thing that doesn't move. We need to crouch into this 'Lid' to start the Super Jump. (click images for larger views)
Crouch into the 'Lid' while moving forward for just a few seconds.
Here we are crouching into the 'Lid' so we can 'glitch' the game so the Halo 2 Super Jump will work.
Next, turn to your left and head on over to the 'Middle' (ontop of the class). Remember don't stop moving and don't click crouch again.
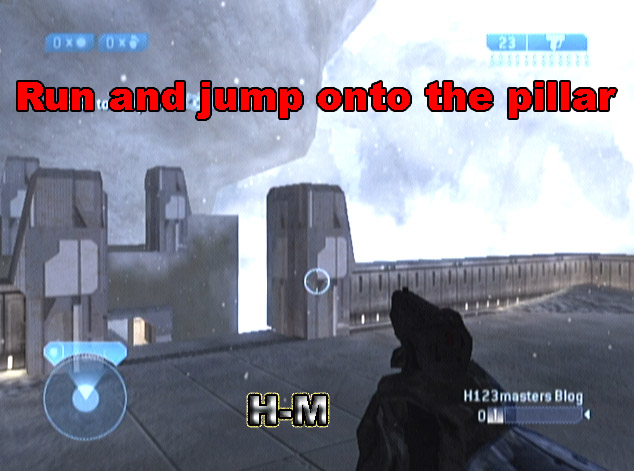
Once in the 'Middle' turn and face the pillar shown in the picture above (click for larger views). and get ready to jump off of it and land on the X.
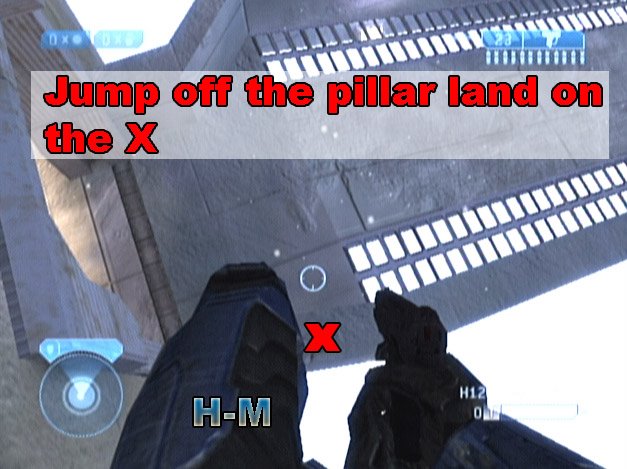
Here we are jumping off of the pillar. Land on or somewhere close to the X shown. It is on the rail of the'Elbow' bridge.
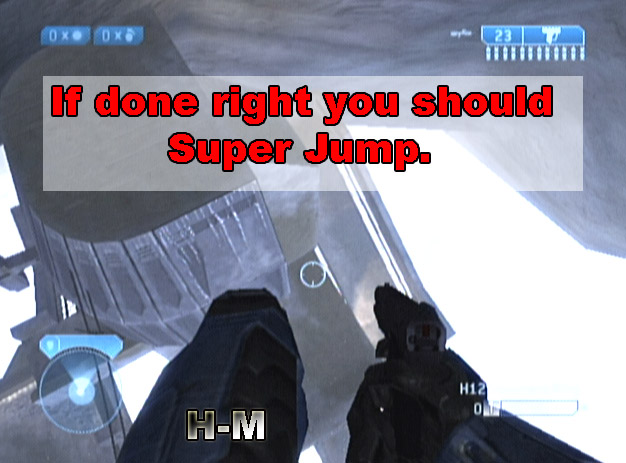
If you do it just right you should Super Jump. That's all there is to it, practice this and you could use it in match making, it's useful for getting on top of the 'Sniper Tower', just fly over to it once your in the air.
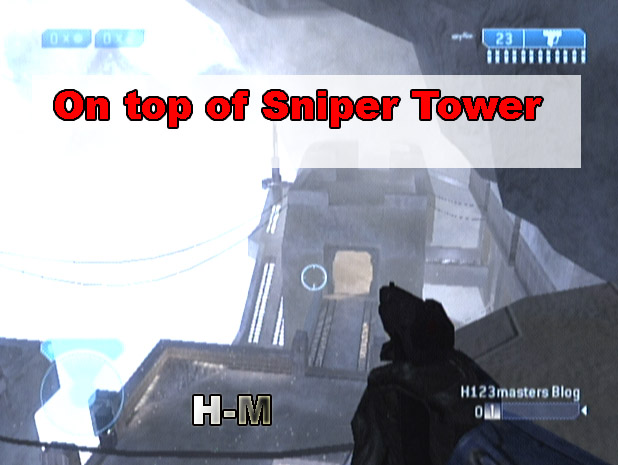
ClICK HERE to Read The Full Post

Thursday, February 09, 2006

SuperBounce3-Ascension-Halo2

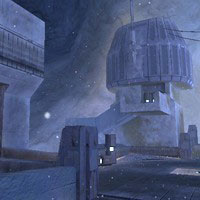
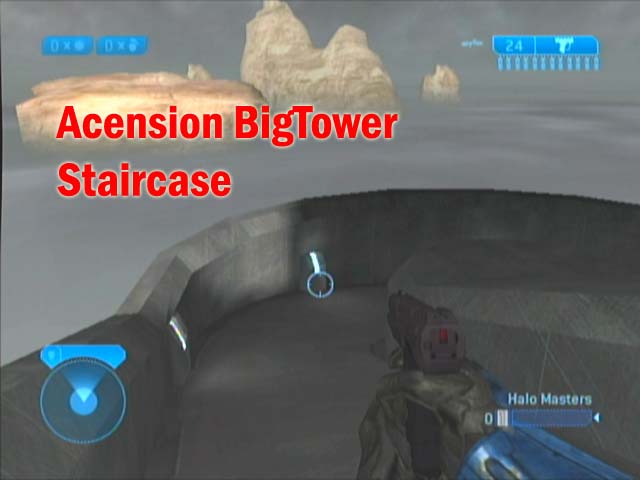
In this Halo 2 Super Jump we will be at the ''BigTower Staircase'' it is
the spiraling ramp leading from the bottom level of BigTower to the second level of BigTower.

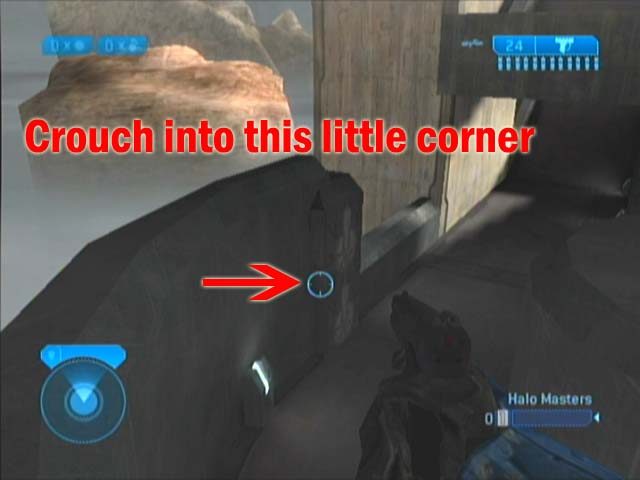
Once your at the Staircase, find the little corner near the bottom.
(click the images for larger views). You will need to crouch into this corner for just a few seconds, so hold Left T-Stick while moving forward.
Next thing you do is turn completely around and go up the
Staircase to the edge/railing (Remember you can't stop moving once you've crouched into that corner, also you can't crouch again either, if you stop moving or click crouch again, while heading to the jump, it won't work). There is a little crease on the edge/railing of the Staircase that we will use as a guideline. You will be jumping off the Edge/Railing toward the ''Over
Shield Bridge''. (click Images)
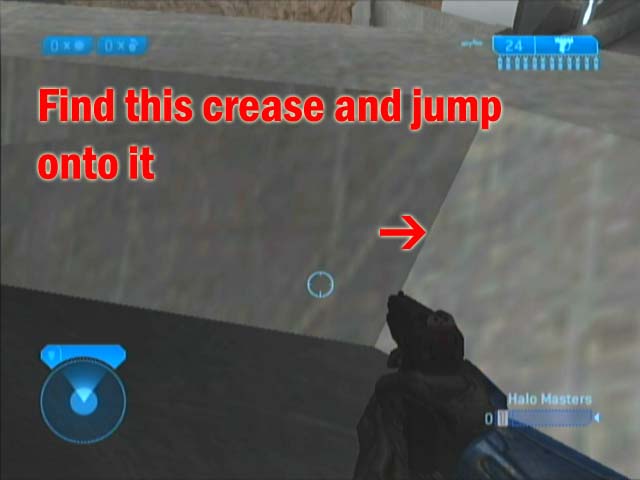
Here is that Crease. Jump onto the Railing don't stop moving, get ready to jump off.

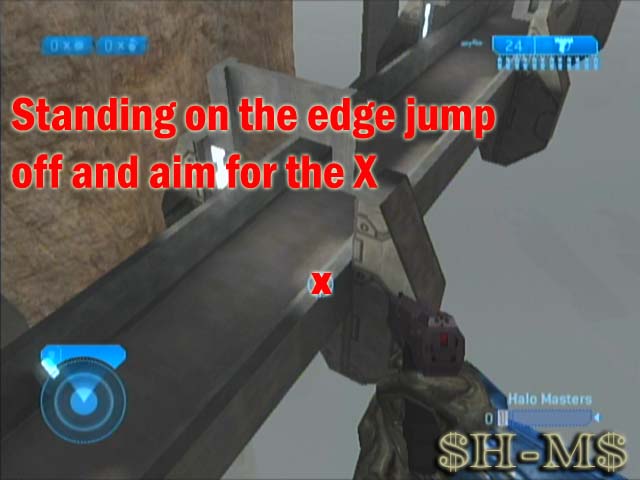
When your on the Rail look for the spot shown on the pictures above. (click for larger
views)
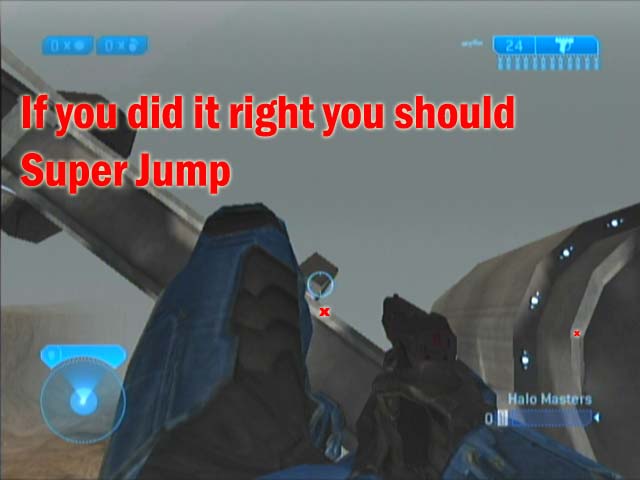
If all Goes well you will Super Jump and will be FLYing through the air.
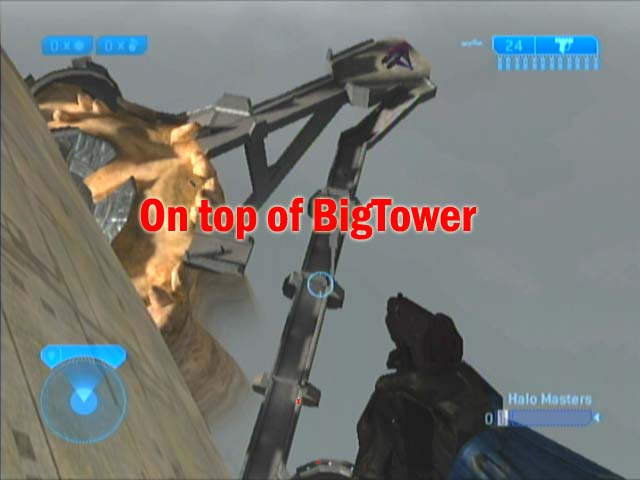
You can get to the top of ''BigTower'' just FLY over to the top.

ClICK HERE to Read The Full Post

NSCS-Overswarm-Map-Guides


Here are some of the NSCS Halo 2 Video Guides,
there are currently five maps.
When Overswarm adds more, we will post them for sure.


Ascension
Video Walkthrough
WMP9(5.5 mb) QuickTime (5.9 mb)
This video walks you through Ascension, and names all of the critical locations - these names will come in handy during play, when someone on your team calls out a location.

Backwash
Video Walkthrough
WMP9 (3.2 mb) QuickTime (3.4 mb) (posted December 14, 2005)
This video walks you through Backwash, and names all of the critical locations - these names will come in handy during play, when someone on your team calls out a location.

Burial Mounds
Video Walkthrough
WMP9 (5.1 mb) QuickTime (5.6 mb) (posted December 14, 2005)
This video walks you through Burial Mounds, and names all of the critical locations - these names will come in handy during play, when someone on your team calls out a location.

Lockout
Video Walkthrough
WMP9 (7.1 mb) QuickTime (7 mb) (posted December 14, 2005)
This video walks you through Lockout, and names all of the critical locations - these names will come in handy during play, when someone on your team calls out a location.

Midship
Video Walkthrough
WMP9 (6.1 mb) QuickTime (6.7 mb) (posted October 31, 2005)
This video walks you through midship, and names all of the critical locations - these names will come in handy during play, when someone on your team calls out a location.

ClICK HERE to Read The Full Post

Thursday, February 02, 2006

NSCS-Overswarm-Team Organization

Team Organization
I've spent most of the weeks of my summer reading books by old generals, ancient strategists like Sun Tzu, and brilliant minds like Bruce Lee. One thing that ALL books mentioned about battles involving several people is the need for leadership and teamwork.

But this isn't war. This is Halo. You don't have 50 or 5000 people playing (that's the next gen systems), you have 16 at maximum. In most sensible tournaments and serious gameplay, you'll find 8 players. This article will hopefully have a good effect on your teamwork, and help you understand the different forms of team hierarchy that you will find.

The first (and most common) form of team hierarchy is the dictatorship form. This is generally what you find at all LAN parties, uneven teams, and several XBLive clan games. When you are playing with a new group of people, you will more than likely be joining a dictatorship. You will not be the dictator.

The dictatorship form is simple. There is one player who (generally) is of greater skill, fame, and/or competence. When I play with new players, I am generally "elected" to be the dictator of our team merely because of my quasi-internet celebrity status brought about from my strategy works. When I played a few games with Sergio from team IGS, everyone was quick to ask Sergio what gametypes he wanted to play, and what they should do when they played them. To anyone who has a fifth grade education, you will know what a dictator is. The dictator gives orders, and the orders are obeyed without question. When one brilliant strategist and player is giving the orders, if they are all followed exactly to the point, it is natural to believe that the team will prevail over any adversary.

There are several problems with the dictatorship form. First and foremost, is the fact that no player is ever 100% correct. There is the possibility of giving wrong orders because you do not have all of the information, because of anger, rashness, poor experience, or even simple ignorance.

Another problem is that every time the dictator dies, there are 3-7 seconds in which his teammates are leaderless. Since the dictator needs to give orders, he has to be in the action to see what is going on. When you are knee-deep in gunfire, you die quite often.

A common problem on X-box Live is that people won't listen to the dictator. When the dictator says "You go on offense, you go on defense, you come with me for the flag, guy on offense cover me" and such, the entire team rests on those orders. If there is one hotshot on your team that gets frusterated because he "doesn't like playing defense", he will generally cost your team the game by rushing straight into gunfire.

The last and most serious problem with the dictatorship form is the burden that it puts on any one player. When you are the dictator, you aren't just giving orders, you are responsible for them. If you say "attack now" and you lose, your team will blame you. This results into the dictator switching roles every game or so, and thus the team becomes bitter and inconsistent.

The next team hierarchy is the "revolving dictatorship" form. It is the second most common form found, and is a natural evolution from the dictatorship form. It isn't a democracy per se, but instead is just a constant change of the figurehead giving orders. There is never a clear indication of when the change takes place, but it generally lasts several minutes when it does, and is most commonly triggered by the failure or frag of the previous dictator.

As you can imagine, there are problems with this form as well. In addition to the dictatorship flaws, the revolving dictatorship leads to a lot of squabbling. Two people will start giving off orders at once, and they will often clash. Dictators that have their role stripped from them will often continue to spout off orders even though someone else has plans in action. A lot of pointless bickering comes from this, and makes this form even more dangerous than the dictatorship form.

The third most common hierarchy is rarely found now that those with XBL have microphones. The silent, or "leaderless", form is rare indeed, because naturally people like to give out orders, especially when they feel they can do a good job lining up the troops. I know I do!

There are a few silent teams out there that do nothing but play the game, and rely on their shots rather than teamwork to win. Oddly enough, the silent teams I find are generally full of good players. They manage to win by playing people who cannot aim as well as they can, and it becomes a habit to just sit there and shoot all day, not saying a word.

There are obvious problems to the silent form, so obvious I won't go over them here. It is important to communicate, very very important. No matter how good you are, talking to your team makes your team player better as a whole.

The last hierarchy is very rare indeed, and generally only comes about when the group of people playing are of equal skill and have played together for some time. The team hierarchy is one of support and respect. Everyone acts of their own accord, yet in accordance with every other teammate. It is difficult to explain, but easy to perceive. If someone says "help me out", the team helps him out. If someone says "help me out", but you are on your way to grab the flag from an empty base, the player may decide to leave his teammate stranded. If this occurs, the team doesn't chastise the teammate because they trust in him to behave wisely. The entire team can follow one anothers lead and advice confidently.

Obviously the team hierarchy is the best, and you should strive for that. But realize that you cannot immediately acheive it. Learn your role and the hierarchy you are in, and play it accordingly. Don't create trouble unless you absolutely have to. Naturally, over time, you will acheive the team hierarchy.

The next section of the article goes over the "roles" that you adopt when playing, and how to play them.

People generally fall into these roles:

Leader
Defense
Offense
Objective
Slayer
Assist
Weapon whore


In all reality, you SHOULD be able to switch from role to role instantly, and know when to do it. Teams like 3D, the reigning champ of halo 2, has done so well because they all can do everything. They excel in all areas, not just their specialty. For us mere mortals, we must realize what our role is and how to use it. Please realize that the following is not black and white, and there are always exceptions. Also keep in mind that you can be more than one role at a time, such as a Offense and Assist player.

The leader gives orders. That's about it for that role. He looks, listens, and guesses on what to do next based on the information given to him. He tells his teammates, and the teammates do thus. This role is obsolete in well practiced teams, and is generally only found in dictatorship hierarchies.

The Defense player guards certain weapons (like sniper or rockets), locations (like key choke points), or objectives (like the flag or hill). His goal is to sit and roast marshmallows until he has an opportunity to hurt the enemy from his location he is defending. This role is the most important in objective games, and should not be taken with a "blah" attitude, nor given to someone who you believe cannot play well.

The Offense player is one that goes to the enemy, instead of letting the enemy come to him. He is the one who goes to get the flag, grab the power weapons or powerups, and generally is a role given to those that have good survival skills. The offense player's goal is to keep the enemy from reaching the defensive player, and to speed up the progress of the game in his team's favor.

The Objective player is one that doesn't care about the limitations that offense and defense has, but instead keeps his mind on the objective at hand. He is the one that constantly goes in the hill, grabs the flag and tosses it to his teammates, holds the oddball, and plants the bomb. Dedication, awareness, and good survival skills are a must. I personally take this role in most of my games.

The Slayer is a coveted role. While the slayer is very similar to the offense player, he is not just that. While the Objective player focuses only on the objective, the slayer focuses only on killing the other team. He will just toast the enemy with frag nades and a BR to clear a path for those on offense, and to keep those on defense safe.

The Assist is seen as a weak players position, but is the natural role of the wolf. The assist player doesn't really focus on himself, but rather his teammates. He will shoot an enemy two or three times and then run, only to let his teammate finish off the kill. This results in a healthy player constantly weakening the enemy for his teammates, and can do a lot of good. Playing with a good assist player on your team is like playing against a team with a handicap.

The weapon whore (I apologize for the crudeness, but the name has been around for some time) is a role similar to both defense and slayer, but has an obvious difference. You use the (power weapon), and your main goal is to keep the (power weapon) and kill enemies with it. The weapon whore needs a lot of survival skills, and has to have excellent aim as to make the most of the power weapon. If you have watched the 41-0 vid, you've seen this role in action. This role is difficult to maintain like that (as Ogre 1 constantly has stated to me, it was a fluke), but the longer the better. Since the power weapons don't respawn until they are out of ammo and dropped, merely keeping them out of the enemies hands can be a great help.

Hopefully seeing these roles in writing rather than in action, you can understand more clearly how they work. This will also help you realize what your enemy is doing; when you see a player on defense all the time, you can quickly realize that he won't leave his base. That means that only 3 of the 4 players on the enemy team will be assaulting your base, at the most. Putting two and two together like that can be the difference between victory and defeat.

ClICK HERE to Read The Full Post

NSCS-Overswarm-Matchmaking-Gametypes-Foundation


Team Skirmish
Classic CTF on Foundation


Weapon control

Rockets
Shotgun
Sword
BR
(there is no offense/defense, since you are always on offense and defense at the same time)

Overstrat #1-
Phase 1

All players go immediately to collect the strongest possible weapons. They also clear out every bit of explosive material they can.

Phase 2

Player 1 goes to the center of the map, and sits and waits, looking at the base that holds the enemies flag.

Player 2 sits back at the Battle Rifle/rocket ammo area and plays defense. If he sees a large group of the enemy coming to his base, he warns his teammates, then Player 1 and Player 2 both prepare to stop the flag carrier when he leaves their base.

Player 3 and 4 both are going to the enemies base. Their goal is to grab the flag, and get it out of that room. Then, they jump, and throw the flag to player 1, who is waiting to catch it.

Phase 3

Player 1 catches the flag, and then waits for player 2, 3, and 4's view of the surroundings before moving. If the enemy is running towards him, he hides and lets his teamates help him. If the enemy is looking around, he hides in the center. If the enemy has their flag and is running with it, he hides in the center until his teamates can get it back, so on so on.

Player 2 stays at the BR spawn, and escorts player 1 back to their base.

Player 3 and 4, if surviving, both run together, pecking at the enemy when they can. If it's a clear run for the flag carrier to get back to the main base, then player 2 and 3 stay at the enemy base so they are ready to grab the flag the moment it reappears.

If player 3 and/or 4 died, then they help player 2 escort player 1.

Phase 4

Player 1 runs to the vent, goes in it, then goes in their base.

Player 2, 3, and 4 help him.
That's it. Easy score.

notes:
Most teams have found it best to not go in the enemy base unless you have a rocket launcher.
Most teams end up not going into the enemy base until they've killed every enemy on the outside.
Some teams find it necessary to have player 2 come and help player 3 and 4 get the flag out.
Many experienced opponents will only let this work once. After that, player 1 needs to be wary, and player 2 needs to cover him.
Player 1 shouldn't hog many weapons. He doesn't really need them.
Player 1 should not hesitate to throw the flag to a teammate waiting by the lift near their base. The faster the better

ClICK HERE to Read The Full Post

NSCS-Overswarm-Matchmaking-Gametypes-Zanzibar


Team Skirmish
Assault on Zanzibar


We're off to Zanzibar! To meet the Zanzibarbarians!

Offense
Weapon Control


Sniper
Rocket
Sword
Shotgun

Overstrat #1-
Phase 1

Player 1 grabs the bomb. He goes to the warthog and gets in the passenger seat.

Player 2 gets in the drivers seat for the hog.

Player 3 gets in the ghost and goes on a suicide run to open the gates.

Player 4 grabs the sniper rifle on the sea wall and attempts to cover Player 3 so he can open the gate.

Phase 2

(this is assuming that player 3 opened the gate. If not able, repeat phase 1, try a different strategy, or do phase 1 except have EVERYONE run in (no bomb) and try to open the gate)

Player 3 (presumably dead and respawned) gets in the remaining ghost and then boosts ahead, hopefully showing where the RL toting enemy is.

Player 1 and 2 follow close behind in the warthog, and go towards the gate letting the ghost and the sniper cover them.

Player 4 is moving along the camo path, covering the hog from anyone he can see. Player 4 is constantly moving towards the camo-side entrance to the base.

Phase 3

The warthog parks outside of the base (right in the door), and the driver and bomb carrier get out. The driver gets in the gun turret and prepares to protect the bomb guy. Player 1 goes to arm the bomb, and Player 2 covers him with the turret.

Player 3 flies in with his ghost, and pretty much just tries to be a big distraction, and tries to flush out anyone hiding in any corners.

Player 4 should be crouch walking up top, and sniping from the second tier, getting anyone hiding on the top floor or the ramp by the stairs.

Phase 4

Hopefully, the bomb should be armed. If not, player 4 stays ALIVE, and hidden, and continues repeating his role.

Player 3 has the new role of contesting the bomb nonstop by hiding in rooms and corners.

Player 1 and 2 constantly attempt to arm the bomb.

Remember to communicate, because if all 4 of you are at the base, and there are only 2 enemies, drop the bomb and all 4 of you gang up on them, then arm it. Know when you should drop your roles.

Note: This strategy works great for lower levels, but as you get higher up, it is more likely that for each enemy you take out, they will take out one of yours. It is also less likely for you to be able to open the gate on your first try. This also doesn't work the second round, for most teams tend to react to a common strategy like this.

Overstrat #2
Phase 1


Player 1 grabs the bomb and a BR on the seawall.

Player 2 Grabs the BR in the sea cave, and watches the explosive sniper zone.

Player 3 grabs the ghost and drives to the explosive sniper zone and tries to take that sniper. When he does, he runs back to the beach.

Player 4 grabs the sea wall sniper and watches the explosive sniper and tries to get a shot at the rocketeer if he can.

Phase 2

player 1 is following the group, going camo side.

player 2 leaves the cove once the explosive sniper is retreived by player 3. He then grabs the shotgun and guards player 1.

Player 3 then gets on the top camo level, and grabs the camo. He knocks down the bridge, and then sneaks around the top. Remember to crouch walk. If he can, he will kill the rocket holder. Otherwise he's just going up top and watching the entrance to the top/camoside entrance.

Player 4 watches the front of the base and camo-side entrance.

Player 1 and 2 go to camo-side entrance, crouch walking so they don't appear on radar.

Phase 3

Player 3 sneaks through the top of the base, and goes in the entrance, then proceeds to move towards the left side of the base (the one with the holes in the wall that can be covered).

Players 1, 2, and 4 sneak into the base.

Phase 4

Players 3 and 4 snipe from the top, from opposite sides. Their main goal is to make each other stay alive.

Player 1 breaks the glass and tosses the bomb down to the bottom floor.

Player 1 and 2 then unleash grenades and bullets on the enemy, bringing them to the open to be sniped.

After a bit, Player 2 jumps down with the shotgun, and player 1 jumps down and starts to arm the bomb. Player 2 is guarding him with the shotty, player 3 and 4 with snipers.

If player 1 dies, player 2 grabs the bomb (and tries to drop his shotty). Player 3 or 4 then takes the role of shotty.

Remember to look down when arming the bomb.

Note: This normally works fairly well if your snipers are good, and you can take out rockets early. The most common cause of failure here is not communicating to your teamates where the enemy rocket launcher is, and the RL kills player 1 and 2, or both snipers.

Another common cause is someone holding the rockets in the stairway, and just watching the planting zone. Player 2 should look there when he jumps down, and if he sees the rocket guy, should tell the snipers to take him out.

Snipers should always be prepared to drop from the top floor to the bottom through the glass, and switch to their SMG (or other weapon if they picked one up) to attack close range.

Assault on Zanzibar is hard. It will almost always be a tie, sadly, against two groups of good players.

Zanzibar is a bad map for assault. Great for CTF, but bad for assault.

Defense

There's only one main strategy, so I'll give you this in shorthand.

Player 1 - Grab the shotty outside the base, then go grab camo. Then wait for them. Watch and communicate and tell your teamates where they are coming from. Don't engage in combat unless they see you, or you are fighitng the end of their line.

Player 2- Grab rockets, then sit down in the stairway and watch the bomb planting zone.

Player 3- Grab the BR and try to get the explosive sniper. If you can, get to a preferred sniping zone and watch the entrances, but be close enough to where you can get to the base to help if need be.

Player 4- Watch the top, so if someone comes in camoside you can pin them with grenades, and if someone comes in windowside, you can prevent them from opening the gate.

Then, just continually go back to the base and watch the bomb as soon as it is dropped.

RL guy, your job is to keep the RL out of the enemies hands, not get kills. Just keep the RL, use it only when you have to.

ClICK HERE to Read The Full Post

NSCS-Overswarm-Matchmaking-Gametypes-Colossus


Team Slayer
Colossus


basic info about colossus during a team slayer match

It's like Vietnam, but less hope.

This map is not a "gung-ho kung-fu hero blast 'em all" map. This is a team effort map. You cannot kill the opposing team by yourself. Stay with the group, or meet with the group, or get to the desired location at the same time.


The S in SMG stands for sub-par

This is not a submachine gun map. Your distance between the enemy is ever-changing, and you are constantly going uphill or downhill. Get a shotgun, PP/battle rifle, plasma pistol/magnum, or a sniper. If you don't, you are as much a hindrance as you are a help to your team.


Snipah!

For team slayer on colossus, it's all about control. Control of the sniper. You want it. You need it. Get it.


what to do if you have the sniper

-Get to a sniper spot-

There are FOUR main sniper spots. Count 'em, four. If you learn one thing from this, realize that the place where the sniper spawns is NOT one of them. I am listing these spots in order of personal preference. They all have their own advantages.

The first and second sniper spots are the red and blue bases, near where the flag would be on CTF. Stand near the walls, and you can see a good portion of the map before they can see you.

Advantages:

Visibility (you see the enemy easier)
Cover (you have plenty of cover from grenades and ranged fire both)
Hiding spots (your teamates have plenty of places to hide so they can cover you well)
Distance (the enemy has to walk a long ways in visible territory to reach you)

Disadvantages:

Distance from sniper spawn (if you run out of sniper ammo, it is obvious, and they can get there first)
Cover (the enemy has plenty of it when trying to reach you, unless teh sniper reveals himself)
Mobility (you have very little mobility in this area, that means no escape routes)

The other two are near the sniper spawn, the spots to the far right or far left, near the hole.

Advantages:

Near the sniper spawn (you can continually have it)
Visibility (You can see a lot of straight lines)
Cover ( you have lots of cover. The doorways can only fit two people!)
Escape route (easy escape routes for your entire team)
Easy to know when enemy is coming (sound of teleporter, long walk up the ramp, or jumping through the hole)

Disadvantages:

Many places for enemy to reach you (tunnel, ramp, hole, lift)
The enemy can obtain every weapon on the map other than sniper (shotgun, BR, etc.)
The enemy has full access to the overshield
Easy to be flushed out by grenades.

What to do if you don't have the sniper

Get a gun. Any gun, other than an SMG. Powerful guns. Shotguns (they are by the main bases) and BR's (middle floor, on the jutting out places).

BR users- you are the cover against the sniper. If that sniper pops his head out, you poke him with it so he can't zoom. One guy can't do this, so use teamwork here.

Shotgun, PP/Magnum, P.Rifle/SMG, etc. users- You are running in, trying to corner the sniper. Flush with grenades if possible.

Your goal is to kill the sniper, and grab the sniper, and leave. It doesn't matter if you kill only the sniper and the rest of your team dies, that is your goal. Grab that sniper, then go far away, or leap down to the bottom floor in the open.

Your team will spawn, and then they can cover you.

-OR-

Hide. If they have the sniper, and you have more points, hide. Make them come to you. Sit by corners, and just be patient. Time is on your side.

what to do if your teamate has the sniper

Keep him alive, even at the cost of yourself. It doesn't matter if you die, so long as the sniper survives. You listen to every word he has to say, and do exactly what he says. Don't go running to get your favorite gun, don't jump off chasing bad guys, don't do anything except protect the sniper.

Also, SPEAK! I've lost 4 or 5 games on colossus because I'll get the sniper, and then my teamates don't tell me anything. The sniper can only see so much, and everyone is human, so they might miss an enemy now and then while they're looking. If you don't have the sniper and you see them, tell your team. If the enemy is coming at you, tell the sniper, and tell him how many. Tell him if he needs to run.

ClICK HERE to Read The Full Post

NSCS-Overswarm-Matchmaking-Gametypes-Midship


Team Skirmish
CTF Classic on Midship


Weapon control

Battle Rifle
Shotgun
Sword
Carbine (note: The Carbine should only be used on Defense. It's accuracy is too sporadic for long range combat against several opponents.)

Overstrat #1
phase 1

Player 1 Leaves the base, and goes towards the enemy base, travelling either the plasma pistol path or the Carbine path.

Player 2 travels the opposite path of player 1.

Player 3 goes and attempts to get the shotgun. If he fails, he gets the Carbine or duel wields plasma rifles, then sits in the base on defense.

Player 4 goes underneath the base and grabs the battle rifle. If possible, he gets the plasma pistol, then returns to the base and stays on defense.

phase 2

Player 1 and 2 go in the enemy base. Their goal is to grab the flag, and throw it to the middle. It doesn't matter if they die. Sometimes it can be preferred!

Player 3, seeing player 1 and 2 go into the enemy base, drops down to the center to catch the flag. When he catches it, he runs, then jumps and thorws it to player 4.

Player 4, as soon as player 3 jumps down, waits for player 3 to throw the flag to him. Then, he scores.

Notes:
Player 1 and 2, after respawning, should immediately go straight to blue base to repeat the strategy. Sometimes you can pull it off two times in a row.

If player 4 has enemies in the base, and would therefore not be able to score, he should tell player 3 to just run it. Then, when palyer 1 and 2 respawn/get to the base, they should go on defense.

Overstrat #2-
phase 1

Player 1 and Player 2 go opposite paths to the enemies base.

Player 3 goes to grab the shotgun or carbine, then goes back on defense.

Player 4 gets the BR, then amybe the PP, then goes on defense. (sound familiar?)

Phase 2

Player 1, when he gets to the base, hides near it.

Player 2 rushes in, grabs the flag, and throws it out.

Player 3 and 4 stay in their base.

Phase 3

Player 1, after watching the opposing team fall out like ants for the flag (especially if you try this after Overstrat #1), runs in, waits for them to touch the flag to make it return, then picks up the flag and goes along one of the side paths to score.

Player 2, after respawning (because he IS dead), does what he can to help player 1.

Player 3 and 4 stay on defense, and peck at enemies from afar.

Notes:
This strat can go on a loop. Player 2 can go and wait in the enemy base, and after player 1 scores, do the EXACT SAME THING.

This strategy works best after doing something like strat #1 the first time, where your entire team is into capturing the enemy flag. That way, the enemy feels they all need to work together to return the flag, when really they only need one.

If someone does this to you, just remember this rule: The guy with the BR always stays in the base. Always. He can just peck at the guy with the flag from afar.

ClICK HERE to Read The Full Post

NSCS-OverswarmMatchmaking-Gametypes-Coagulation


Team Slayer
Coagulation
First off, a short comment: Good God almighty, WHY?!

Now on to the goodin's. I'm doing this a bit different, and labeling each manuever as "defensive" or "offensive"

defensive manuevers

Cave men

If your team could learn one thing from this article, learn this.

There is a cave on one side (near the tele exit, dark side) that is fairly easy to find. This cave has two entrances, both of which are easily defended. You can narrow it down to one entrance if you use your vehicles correctly. Try using banshees to fill the cave mouth.

Vehicles have a hard time manuevering in here, but if you set up warthogs in the right places, you can easily have someone guard the entrance with the turret. If you've got two hogs, do it with both!

If you get the Rocket Launcher, your vehicles are safe, and this will work wonderfully. If you have snipers, you can easily snipe from the cave entrances, and even if you get sniped, your team is there to pick up your rifle at any time.


The Bastard Manuever- Part I

This one isn't much fun, but is good to use to win if you REALLY have to. There are several ledges you can get on top of with banshees. If you can get both sniper rifles and both banshees at any time, go to these ledges (the ones you can't walk to), and hold your sniper rifle. Your two teamates then get the banshees, and do nothing but destroy unmanned vehicles and evade. One of the owners of the banshees holds the RL.

Really, there's no way to do anything against this other than get a ghost or a hog and try to take out the enemy players, but that's hard to do against a good team.

I've had this done against me once, and it was hard as hell to stop.

note: I killed their snipers with BR/PP combo, so have snipers watch out for that.


The Bastard Manuever- Part II

I've personally done this. Get two warthogs and a rocket launcher, and as many snipers as you can. We personally had both snipers. Drive up to the hill behind red base (in the darkness), and park both hogs there. Then have your two snipers just sit there and wait until they can pull off a shot or two. If a Banshee or ghost comes, the RL takes them out.

We had two deaths from this, and they were from a guy who flew his banshee over us, then got out, and fell with his banshee, throwing frags down at us. He killed one of us, then stole a warthog and drove towards red base, and his teammates killed our gunner. It was like some weird ritual. Unfortunately for them, I was sniping, and I got three headshots and then we got our hog back. But it was cool.


offensive maneuvers and general rules

There's nothing like the smell of cordite.

The Rocket Launcher is THE KEY to this map. Snipers are awesome, Banshees are awesome, Ghosts kick ass, Warthogs are wonderful assault vehicles... but Rockets trump them all. Get Rockets, and if you don't have them, spend all your efforts trying to retrieve them.


I am Vehicles, the spartan, the warrior!

Get vehicles. Preferably Ghosts and Banshees, but if there is one ghost and one hog, and two of you, both get in the hog. It's better that way.


Sniper joe

Get the sniper rifle. There are Many sniper spots that I won't go into now, but you can find them on the "map guides" section.


Hog it!

The warthog is probably the most effective weapon on this map, if your team can use it well. I personally advocate ghosts and banshees, since they are one-man vehicles, and are easier for evasive purposes. However, if you have a good driver and a good gunner, and your driver can keep your gunner at a good angle, you will win every fight.

It works even better if you have a guy with rockets in the passenger seat, looking for banshees.


The best of both worlds

The plasma pistol / Battle Rifle combo is really effective near the warps, especially if backed up by snipers and Rockets.

Get the PP and a BR, and go to a warp exit (either one). You have enough cover to guard yourself from vehicles and to hide if need be. Rockets help against banshees, but you can normally hide from banshees pretty easily in the rocks/caves, so the PP/BR is a good fallback if you can't get anything else.

A lot of the time, the PP/BR guy just camps the portal, and covers the snipers that are near him.

Team Skirmish
1 Flag CTF on Coagulation

If the defending team is half competent, you will fail on your assault.

Now, off to happier things!

Weapon Control
Once again, weapons are important. You should keep the following in mind:

Sniper Rifles
Rocket Launchers
Battle Rifles

Offense
Overstrat #1-

Phase 1

Player 1 grabs the sniper rifle, goes through the teleporter, and then watches the rocket launcher and the enemy portal from safety. If he sees a sniper come through the enemy portal, he engages combat. Ditto for anyone getting the RL (but wait till they are out of their vehicle!)

Player 2 Immediately grabs the banshee and flies over to the enemy base, directing fire towards him, and trying to destroy all the enemy vehicles. He scouts near the enemy portal as well, and announces if any enemies are going there. His main goal, however, is to flush the enemy team into the base.

Player 3 grabs a good close-range weapon (if desired) and then a ghost, and goes to grab the rocket launcher.

Player 4 grabs the Battle Rifle, and then gets in a warthog, and waits until the others finish their parts of phase 1.

Phase 2

Player 4 drives his warthog and picks up Player 1, then drives them to the enemy portal zone. They then snipe the enemy off the base and help the banshee out.

Player 2 keeps firing with the banshee until the ghost gets there, and the guy with the RL is on top of the enemy base.

Player 3 drives his ghost up to the enemy base and gets on top and waits, staying out of view.

Phase 3

Player three fires a rocket or two into the base to scare the enemy a bit.

Player 2 then falls out of his banshee, goes into their base from the top, grabs the flag, and jumps up and throws it to player three.

Player three then goes into the enemy portal, where the warthog is waiting. He gets into the passenger seat, and Player 3 and Player 4 drive off to the enemy base.

Player 2 is probably dead and respawned by now, and should be running towards the middle of the base (in case the hog is destroyed).

Player 1 continues to snipe from the enemy teleporter, and tells his team if a banshee or enemy vehicle is coming.
Then you score.

Notes:
The player with the RL should help out the banshee by taking out any vehicles firing at him.

The player with the banshee should definately focus on staying alive if vehicles are against him. The RL will be there soon to help him.

Variations

Same thing, except the ghost player and the banshee player steal the enemy warthog, and use it to steal the flag through the floor, then drive off. Some consider that bad manners, but it is legal in gameplay.

The other guy in your hog with the sniper could drive with you, and they wouldn't know which one to shoot at, and you would have a backup incase they got the right one.

Defense
Phase 1


Player 1, the teams best sniper, grabs the sniper rifle and then proceeds to walk up to the nearest cliff, where he can cover his portal/top of the base from safety. If he's lucky and gets the good side, he can also cover the RL. The sniper will stay unknown unless it is absolutely necessary to reveal himself.

Player 2 grabs a ghost, goes to grab the RL, then run back as fast as he can. He doesn't want to kill anyone, he just wants to make sweet sweet love to the RL.

Player 3 grabs the preferred close range weapon(s) of choice, and then sits inside the base, watching the front door.

Player 4 grabs a banshee, and then proceeds to attempt to destroy the enemies warthog (as well as his own team's hog). If player 2 is unable to grab the rocket launcher, the banshee then attempts to harass the use with the RL, using barrel rolls to dodge his rockets. If he dies, no big deal. He just repeats what he's been doing, except in a ghost. Or, if there is no ghost, harasses with a BR from the rooftop of his base. Player 4 is mainly a scout.

Phase 2

Player 1 just snipes, that's it. He has the Brute shot available to him if someone comes up on foot, but he should be okay as long as he doesn't try to take on a banshee. Player 1 should attempt to kill whoever is on top of the enemy base and be a real pest about it. Time is of the essence.

Player 2, if he has the RL, goes and roasts marshmallows with player 3. If not, he stays on top of the base and scouts out to the rest of the team, and only goes to roast marshmallows if he has to.

Player 3 is sittin pretty.

Player 4 knows what he's doing.
That's it. Defense, not much to it. Just watch 'em, communicate, and think one step ahead. It all pretty much boils down to your sniper and if you get the RL.

Notes:
If your sniper runs out of ammo, it is generally best that he drop his sniper rifle and then go back to the main base to retreive the new one in the 25 seconds it takes for it to come back. If he can't drop it, he should throw grenades to kill himself, and then go to retreive it.


If the enemy has your flag, and is speeding across the map in a hog, you've probably lost. Your best bet is to get there before him, or to kill his hog. Your sniper might get lucky. But pretty much, you've lost.


If the enemy has your flag, and you don't know where he is, get to the enemy base and watch it from there. Hopefully you will see them and be able to take them out.

ClICK HERE to Read The Full Post

NSCS-Overswarm-Matchmaking-Gametypes-Lockout


Rumble Pit
King of the Hill - Lockout


This is mostly a few little tricks, so just going to bullet them.

Throw grenades in first, and then run in. Don't announce your presence with your guns blazing, just throw grenades and fire when you are in optimal range.


If you are having trouble keeping up in points, get in the corner of the hill (near the sniper), and just sit there. Crouch, and don't shoot. You'd be surprised how well this works. When people finally do see you, nine times out of ten, they are dying from someone else shooting them. Just don't shoot back, and keep attention away for yourself.


No scoping is great on this gametype. I just grab the sniper and stand still, pulling the trigger when they walk in range. You really only have to hit them once, they'll be finished off by a nade or something.


Suicide nades are great. Throw them straight in the air, or right on the ground, right before you die. A lot of times they can cause a lot of havoc.
That's all for that. Easy stuff. Run in, get the hill, die. Repeat. A lot of FFA KOTH games depend on your spawns and your ability to aim.

ClICK HERE to Read The Full Post

NSCS-Overswarm-Matchmaking-Gametypes-BeaverCreek


Team Skirmish
Neutral Assault on Beaver Creek


Neutral assault is hard to win in the first place. You are assaulting THEIR base when you have one guy who is weaponless. If he dies, someone else has to be weaponless, so technically, they lose two guys if you kill that one. It can be tough. So this should help you out.

Weapon control

First thing to do is get your weapons. I'm going to list off, in order of priority, what weapons you should shoot for.

Shotgun
Rocket Launcher
Plasma Pistol
Magnum

All those weapons are good at short range, and take out an enemy quick. That's what you need. Sniping is about useless on this map with this gametype for the assaulting team, and has limited usefulness for the defenders.

Future reference: Offense is when you have bomb/flag, Defense when you don't, Neutral when both teams can access said item.

Offense

Infiltration locations with their advantages and disadvantages

Top of base
advantages:


immediate access to the base results in quicker arming
The entire team can enter simultaneously
Teammates can safely wait there for others
You can cover those going through the teleporter
You can tell exactly how many enemies are in the base before entering
You can weaken any enemies in the bomb room with grenades before entering
You can change your point of entry to any of the others at last minute
You can see the enemy coming to get you, since they have to jump to get on top of the base. (Radar)


disadvantages:
The enemy can see you on radar, since you have to jump to get up there, and thus will know the moment you are there
The enemy has plenty of places to hide and could attack your team from every direction
The enemy can hear every word you say while you are above them
Once you are inside the base, suicidal grenades are a benefit to the defending team, and are very likely to kill you
Stray rockets from your team, or aimed rockets from theirs, can kill your entire team easily.
No way for you to escape if need be
Their entire team will almost always be there, and be ready, since they know that is where you are coming.
no worthwhile weapons or powerups on the way, save for a plasma pistol


Needler side ramp

advantages:
Easy undetected access to their base, if reached through teleporter
Allows your team to attack from both the left and right once inside the base, trapping the enemy.
Allows you to bypass any sniper that the defending team would have easily
Plenty of cover in case you are actually seen
Easy escape routes if detected early
Dual needlers actually working when you are in that close of a space

disadvantages:
No powerups or weapons of much worth on the way
In full view if someone is watching from the rocket spawn, a heavily guarded area
If detected when in the tunnels, grenades or rockets can decimate your entire team
if detected early inside the base, almost 100% chance of failure
The battle starts far away from the bomb point, and they might respawn close enough to fight twice.
Possibility of the bomb dropping away from the bomb arming location, making it very hard for you to do anything until it returns


Tunnel near creek and Main entrance

advantages:
You pass by every worthwhile weapon and the OS
your entire team can see every enemy together, and can fire together
it is easy to pick any of the entrances when approaching from the front, so you can change plans if need be
Dual needlers actually working when you are in that close of a space


disadvantages:
In full view if someone is watching from the rocket spawn, a heavily guarded area
If detected when in the tunnels, grenades or rockets can decimate your entire team
if detected early inside the base, almost 100% chance of failure
The battle starts far away from the bomb point, and they might respawn close enough to fight twice.
Possibility of the bomb dropping away from the bomb arming location, making it very hard for you to do anything until it returns
In full view of enemy snipers from almost every advantageous sniper spots.


OS' preferred plan(s) of attack


Entire team crouch walks through the teleporter with as good of weaponry as possible. Bomb carrier and someone with a good weapon go to where you can jump to the roof, but do not reveal themselves.
The remaining two players then crouch walk to the needler ramp, then crouch walk inside. They then, when approaching the two ramps to reach the inside of the base, start to crouch walk up and signal to the bomb carrier and his teammate. The bomb carrier squad then jumps on top of the roof, and then breaks the glass. Both groups then throw grenades inside (one round), and then all enter, with the bomb guy entering a moment or two after the rest. The bomb carrier arms while his teammates attack the opponent.

Why: The various points of attack make it easier for the assaulting team to focus on one enemy at a time together, and put grenades at their advantage.


The entire team gets on top of the opposing bases roof, and breaks the glass. The bomb carrier then throws the bomb inside, and then the entire team chucks grenades from various angles. They then rush in and kill the opposing team, and then pick up the bomb to arm it.

Why: Dropping the bomb causes the entire enemy team to look at that point, which is then when fire starts raining down on them. Then, it's 4 on 4, with your team having the territorial advantage.


Defense

Defending sniper points
sniper spawn
advantages:
easily see three of the entrances for red, and three of the exits from blue base


disadvantages:
the needler side entrance and teleporters on red base cannot be seen, and the needler slope is a common entrance to the teleporter
you are easily seen and avoided/killed
you are far away from your base, and can't do anything if they are arming the bomb unless you mastered the jumps from www.jukesbox.com


top of your base
advantages:
can easily see them coming to your base directly
can drop in to help if the enemy is arming the bomb
your death is a signal that they are coming from the top


disadvantages:
lots of cover for the enemy
very limited sniping capabilities as far as entrances go, and your role is a sniper
easily snuck up on
easily seen and attacked from a distance


Rocket Launcher slope
advantages:
can easily see every entrance
have access to rocket spawn
easy escape routes


disadvantages:
are easily seen
your death means nothing except that the enemy saw you
you are too far away from the base to help if they get inside
this spot is far from the sniper spot


rocket launcher crevice
(Note: This is the tiny slope that faces the red base. If you sit on it and crouch, you cannot be seen from blue base.)
advantages:
can easily see every entrance to the red base
can easily see the enemy before they see you
easy escape routes
simple jumps allow you to go inside the red base at astonishing speeds
no cover for the enemy except to backtrack, once they've been seen
near the rocket spawn


disadvantages:
you can't see blue base
are easily flushed out of that location by someone running up the rock slope


Overswarm's preference

Rocket launcher crevice. It's the most effective and most safe. While if you are on red team you can't snipe blue base, and if you are defending on blue base you can't snipe blue base, it's an excellent spot to start from, and is easily accessed after you get the sniper.
Neutral

I'm going about Neutral a different way. There's three main theories that apply.

Aggressive

This theory is the most common, and is the natural occurrence if everyone follows their instincts. Basically, everyone runs screaming and shooting to the ball, and they grab it and run to the enemy base and try to arm it.


Defensive

Everyone immediately goes to the best defensive positions possible, and waits for the enemy. This has the advantage that everyone is ready, but the disadvantage that you lose the ability to get awesome weapons. Generally, the idea is that since there are only 3 enemies attacking you, they are practically bringing the weapons TO you, and then you get all of them, rather than scrabbling for them.


Passive

Everyone ignores the bomb, and goes for powerups and weapons first thing, which leaves the opposing team with one guy holding the bomb, and three people holding SMGs. This works great if you are fast, the enemy is all about getting the bomb, and you can get back to your base before they arm it. It's risky though.


Try mixing and matching those 3 mentalities throughout your team, until you get a match that works for your team.

ClICK HERE to Read The Full Post

NSCS-Overswarm-Matchmaking-Gametypes-Ivory Tower


Team Slayer
Rockets on Ivory Tower


Rocket man

Everyone has rockets, so that means EVERYONE can do a lot of damage. That's different in the norm. In normal games, you can run in with guns blazing, over and over, and get two kills then die, and come out ahead.

In Rockets, you want to keep yourself alive. That is your goal. Find places to sit, and paths to take that are SAFE. If worse comes to worse, you want to be dead next to your enemy that you just blew to pieces.

You can do MORE damage if you are alive than if you are dead. Whenever you die, that respawn counter is just taking away. It's not helping you at all. Also, there's a much greater chance to die the moment you respawn. Try to stay alive.


Grenaught

No grenades! You don't need them! It's more profitable to reload and fire again 99% of the time.


Smackdown

You'd be surprised how many people still like to fire rockets in close quarters. Since that kills you both, it doesn't matter who shoots the rocket. Stay close, and just melee them to death. Takes two melees to kill them. One, if you jump at them.


Glass floor

There is a vent near the Overshield. If you go up that vent, land near the plasma pistol, and then turn around, you can see a corner in the ceiling. Throw a grenade in front of you, and grenade jump towards that corner (you'll be standing over the vent). The vent will keep you pushed up, and you will be stuck there. While the whole "being stuck there" sucks, it is an AWESOME spot to shoot from. Go up there with full rockets and nades, and most people won't see you, and you can take them out easy. This is normally where I put bad teammates :)

Grenade jumping is hard to do unless you are the host, but this place is so effective I thought I'd add it anyway.


Beasts of habit

Pick a place in the map, and keep it. Pick one place where your entire team can go, and easily get to from anywhere on the map. Then your team keeps going there.

This way, you won't be stuck by yourself.


Sardines suck

DO NOT CLUMP TOGETHER! If you can melee your teammate within 1-2 seconds of walking, you are TOO CLOSE. Stay far enough apart to where one rocket won't destroy you all.

Team Slayer
Ivory Tower


Ivory tower is probably the most strategic map in the game, in the fact that no one person can really go "gung-ho" and kill an entire team with the way the map is setup. Keep that in mind, and realize that whether you win or lose on this map is due to your TEAM, not necessarily individual performance, more so than in any other map. Pay attention to this map compared to others, and you will realize that against good teams, you will die more on Ivory Tower than on any other map. Unless, of course, your team does well.

You can't see the forest from the trees, but bystanders can see all clearly

In Ivory tower, one thing it has more than any other map is walls. Obstructions in your way. You might not always know what is going on everywhere, especially after you respawn. Always tell your teammates EVERY time you know the location of an enemy or key weapon. When your teammates tell you something of the sort, listen to them, and consider their words truth.

However, be wary. Just because they say "Guy coming up the overshield ramp!" doesn't mean by the time you get there he'll be there. Be smart about who you should go after.


Grab all, lose all

Don't be a power weapon hog. If you have the sword and the rocket, the sword and the shotty, the rocket and the sniper, or anything like that, you are a hindrance to your team. This is more important on this map than any other.

If your teammate has no power weapon, and you have two, hand one off.


Power Overwhelming

Rocket Launcher, Sniper Rifle, Sword, Shotgun, PP/BR, PP/Magnum

Well lookie there, plenty of power weapons for everyone. This map has a lot of power weapons, and they are very easy to get (and safe to get too!), so when you spawn, your first order of business is to get some weapons.

Your team should constantly announce the presence of these weapons so that all may know.


When there is no fish in the sea, the shrimps reign supreme.

When there are no big guns, when there is no real talent, when there is no "big fish in the sea", the little guy wins out. Know that after a large battle and many power weapons are dropped, your enemy does not have those power weapons. Do not be afraid to start combat with merely an SMG and grenades after a large battle, as long as you are a good distance from the previous battle site. There is no need for stealth when your enemy is holding only an SMG.


To cultivate trees, you need 10 years. To cultivate people, you need 100 years.

This is a difficult task, team slayer on Ivory tower. Practice maneuvering from one team zone to another (they are listed later in this article) before actually playing a slayer game. Know your roles, and the roles of your teammate, in each location. Know the roles associated with the weapons you receive, so that you will instantly know what to do in a fast paced game.

I do not believe it will take 100 years, but it takes longer to actually get a good team together and have them flow together than it does to have them read words on a page.


One step in the wrong direction will cause you a thousand years of regret.

I cannot stress this enough, so I'm going to stress it a lot. STAY TOGETHER, and stay in view of your teammates. There are a lot of walls in Ivory Tower, so be aware.

The loss of enemies does not compensate the loss of friends, keep that in mind.


If your body is not upright, your orders will not be followed

Your team will have a leader that will be trusted by all 3 of the other teammates, and one that is proficient at Halo 2 himself. That leader will tell the team when to move, when to stay, and what to do at all times. The leader will never switch leadership to another, nor will he say "I don't know". Any other orders given by another team member are merely suggestions. Don't listen to any orders except for your leaders. Just pick a good leader.

Leaders, if you find that you aren't a good leader, submit your role to another.


Confounded purple alien weaponry! I have been thwarted again!

Get the Carbine for this matchup, it is VERY helpful. It is in a corner by the boxes, near the lifts that bring you to the shotty.

Team Locations

I'm going to give you a few of the "better" team huddle points, where your entire team can comfortably sit and wait for the enemy to attack them. Some of them are better than others, but they all have their advantages. Just know what fits your teams playstyle.

Sniper spot

The sniper spot at the top of the level. This is the most common spot for people to go to.

A guy with a shotty/sword/good close range combo by each hallway (unseen, ready to kill anyone that walks in).

A guy with a sniper constantly looking around, and firing at people coming down the hallways, and chucking nades.

A guy with RL, PP/BR, or something else that is good medium-long range watches the lifts and the hallways.


Magnum corners

There are two little rooms with magnums near the lifts. Those corners are great places to hide (you can even move boxes to give you cover). A sniper, RL, and a few PP/BR combos work wonders in these places.

Guys with shotty or sword should wait in the magnum room and peg people through the slots in the wall.


The lift

If you go behind the lift (to where you are facing the waterfall with the sword), it's a great place to go. A guy with shotty and a guy with sword on either side, a guy with an RL and a guy with a sniper looking down the hall. You can rack up some good kills this way. Just watch out for dual wielders rushing you from the back!


The OS ramp

PP/BR combos and RL's kick butt here. Not only do you get constant overshield, but they have to trek up this long uphill slope to get to you, and that slope is prone to being infested with nades.

If they decide to go up the lift, someone will be waiting with an RL, shotty, sword, or duel wielding combo.

If they try to flank you by going through the yellow hallway, they'll have to get past your sniper. If they do, that means your sniper is dead. You can all easily retreat to another location.

This, I think, is the best spot for teams that have superior weaponry.


The Back End

When you have a sniper, this is a wonderful place to sit, as it is very frustrating for the enemy to assault. All you really need is rockets, a sniper, and dual wields for everyone else, and you are basically set. I normally have someone watching the OS ramp, and someone watching the stairway that leads to the sniper (who is looking at the shotgun door).
It works quite well.

ClICK HERE to Read The Full Post

NSCS-Overswarm-Matchmaking-Gametypes-Independent

Team swords
The map doesn't really matter for this gametype, but here you go for all maps.

Pre-emptive Strike
(Thanks for that one Bush. I might not have thought of a euphemism for "attack" if it wasn't for you!)You do not pull the trigger when the reticule turns red. It is right BEFORE it turns red. The lock-on is actually a bit before it turns red.

I came down, from the rafters. Like a bat!
Stay up high. When you have an aerial advantage, you have a better chance of seeing an enemy as well as a better chance of running away. I can't stress this enough. Your entire team doesn't even have to be together, they just have to all be up high.

You scratch my back, I'll scratch off the head of the enemy trying to flank you.
Buddy up. Get up as high as you can, and then have someone stand behind you. Then you can say "Guy coming up from the front" or "Guy coming up from the back", and you guys are basically guaranteed a kill, even if one of you die. You will never be caught by surprise.

Tag!
Sticky nades have a longer distance, and aren't as glitchy as swords. Often, if playing with a teammate I know that uses sticky nades, He'll throw a sticky nade trying to tag them; I'll throw a sticky nade a bit in front of the enemy, so both hit him, resulting in death, whether or not he is actually stuck.

Behind the visor, they can't see the tears.
Some people could be the most excellent marksmen, but just plain suck with the sword. They're the players that kill someone without dying and go "YES!!!!" If you are one of those players, do one of the following-

Stick with teammates so if you die, they can do cleanup. Don't expect to live. You are fodder.

Hide behind a corner that is heavily traveled, and wait for an enemy.

You might not like it, but it's better for the TEAM. That's what you're trying to do.

Camo...any map.
The camo isn't NEARLY as effective as it was in halo 1, but it still helps a bit; especially in certain lighting and up close

Harder to kill, harder to die
It's harder to kill your enemy when they are invisible, and it is harder to die when you are. That means that whenever you attack, your chances to kill the enemy are lessened. When you run away, you chances to die lessen. Running away is MUCH more profitable in camo games. That means that, when in doubt, run. Your chances are better.

Weapon changes
When you and everyone else is invisible, weapon efficiency changes. Sniping is the most prominent thing that is changed.

Advantages: The enemy cannot see you, and when you CAN see the enemy (uncloaked), it is easier to get one shot kills, sicne their shields will most likely be down.

Disadvantages: You cannot always see the enemy, and it is less likely for you to get kills through sniping.

In short, don't snipe. Weapons that require lots of accuracy aren't nearly as good when everyone is invisible. It's not a bad idea to carry it around, just in case, but don't expect it to get you a killtacular.

Tracking things, such as the sword and plasma pistol, also aren't as beneficial.

Spray n' Pray Grab automatic weapons. At least one SMG or plasma pistol. Then get a complimentary weapon (I prefer plasma rifle/magnum). This will greatly help you make up for the disadvantage of not being able to consistantly see your opponent.

One way, one spray This works best in team slayer (not really in rumble pit, you fall behind). Have you, or your teammates, get into corners and hallways where the enemy can only come at you from ONE direction. Some people really have a hard time with seeing invisible people just walking by, and if you are one of those, do this. You will see the invisible enemy running straight at you, and then you can take them out like in a normal battle.

Butcher line Find places in the map where people consistently go, and let them come to you. Like the lift in Lockout, the lifts in Midship, the Carbine room in midship (watch out for explosives), etc. Those places will be the easiest for you to rack up kills with little danger to yourself.


ClICK HERE to Read The Full Post

Wednesday, February 01, 2006

NSCS by Overswarm

NSCS by Overswarm

Know Thy Enemy

Every player is different, every player is unique, and every player is flawed. Every last one. There is no "perfection" that is attained by any human being struggling along in this mortal coil. Find your enemies flaws. Does he stay in the same few spots? Is he impatient if you do not go out in the open? Does he act rashly when he is impatient? Does he act rashly if he sees you? Does he only use the same few weapons? Watch your enemy like a scientist would be watching a wild animal; take note of where he goes, what paths he takes, how systematic he is. Most of the "Better" players are very systematic, and, therefore, predictable. If something is predictable, it can be stopped.


Know Thy Battleground

One thing all great military leaders know is to never let your enemy choose the battleground. Keep that in mind.

If you know what weapons your enemy will use, then you can easily know where he will go. If you are playing in Lockout, and you happen to be playing someone you KNOW is a sniper, go on the opposite ledge, and just wait to shoot the fuel canisters to take him out. It doesn't matter if he has the sword or not, you'll get it after he dies.

Know the fastest routes to anywhere, and know which are most traveled. Sometimes the longer route is the route best taken (such as going from one base to another in beaver creek).


Know Thy Terrain

Similar to rule #2, but this applies only to your immediate surroundings. Know exactly what you can jump on, what you can hide behind, if your sword will stick out; everything should be known. There should never be a "guessing"; there should never be a frantic moment where you miss the ledge. This game is very precise in how you control your character, know exactly to what extents you can move.


Know Thy Equipment

Have you ever seen anyone play with a timer? That's how they know when a weapon/powerup respawns, that is. Learn exactly WHAT needs to take place before the rocket comes back, before the sword comes back, before the overshield comes back, etc. etc. Your knowledge of this could lead to victory; lack thereof, defeat.
Plasma and Bullets

This shouldn't even be a part of my guide, but there are a surprising number of people who have been surprised when I tell them the difference.
For the most part, every gun in the game goes down one of two types. One is that it is a gun that shoots bullets, one is that it is a gun that shoots plasma. Weapons that shoot bullets are generally human, while those that shoot plasma are generally covenant, with a few exceptions.

Bullets differ from plasma in the fact that they:

shoot shorter distances
have a more sporadic accuracy
shoot faster
do less damage to shields
do more damage to actual health
are capable of headshots

Plasma differs from bullets in the fact that they:

shoot farther distances
have a more intact and predictable accuracy
shoot much slower
do more damage to shields
do less damage to health
are not capable of headshots


Explosives

Explosives are different than other weapons in the fact that it does damage in a "radius". Meaning you don't have to actually hit them (although it is preferred), you just have to hit in their general area. Any damage in their radius that is received from anything other than being hit directly is caused "splash" damage.

I put the needler in this section as it does have some splash damage, even though it is very small. Read up on the needler section later though, as it differs from other explosive weapons.

One thing to really know about explosives is that they are capable of "compact" damage. Have you ever seen a grenade explode near you when you throw a grenade of your own? It generally kills you. All explosive damage combines when there are several explosions overlapping. As long as the explosives are near enough to each other, it is the center of both explosions that is the most dangerous. Knowing this, you should know it is better to stand directly on top of a frag grenade rather than stand near two frag grenades. The damage is not like bullets. Instead of simply stacking damage, the damage is combined and magnified.

Constants

Constants are easy to understand. Regardless, they will always do the same amount of damage. They are constant. They are very easy to aim, and easy to realize what the damage will be when the shot takes place. These weapons aren't bound by the normal rules, and don't fit into other categories.

Weapons and their Categories:

Bullets:

Battle Rifle
Carbine
Magnum
Shotgun
SMG
Sentinel Beam

Plasma:

Plasma Pistol
Plasma Rifle

Explosives:

Brute Shot
Rocket Launcher
Frag nade
Plasma nade
Needler

Constants:

Beam Rifle
Sniper Rifle
Sword
Plasma Nade (when stuck to player)
Melee (although each weapons melee is different)
Things you need to know about your guns

Technical Accuracy
Technical Accuracy is important, and the first thing you should know about every gun. To find the technical accuracy, follow this procedure:

Have someone stand directly in front of you, and then you fire the gun directly at their torso.

After that, have them move slightly back, and then repeat the process.

Repeat the process until you suddenly do less damage, or miss through fault of the gun.

At THAT point, have that person move slightly forward, bit by bit, until you do the same "maximum" amount of damage, without missing. At the farthest point, you have found the ending point for optimal range.

You should only use guns when they are in their optimal range, unless you have no other choice. Shooting beforehand simply wastes ammo.

That is the "technical accuracy". How well the gun aims in of itself without any additional factors.

Some guns, like the shotgun, have no optimal range, since their damage is inconsistent. Obviously, the guns with the best Technical Accuracy have the highest optimal range, and the greatest consistency. The sniper rifle and the Rocket Launcher being the top two.

(You find real gun Technical Accuracy by bench rest shooting)

Practical Accuracy

After you have found the technical accuracy, this is what you need to find out.While technical accuracy is important, practical accuracy is what most people pay attention to.Practical Accuracy is the ability of a gun, cartridge, and marksman to aim and fire at a specific target... and HIT that target reliably, at will, and with confidence.

Practical Accuracy is determined by two things.
The gun itself
The gun user


Personally, I think the best way to find the practical accuracy is to play the campaign, but you can't do that with all the different guns as much as you'd want, for reasons of availability and ammo i.e., rocket launcher, magnum, etc.).

So I'm going to tell you how to do it in multiplayer with some friends.

Get yourself a good buddy, and play a game with no kill limit, time limit to an agreed upon time. Have that guy do nothing but run around you, jump, and be sporadic and random.

Now, after you do it and the time limit goes up, write down your kills with the gun, shots fired, shots hit, and accuracy.

Now repeat that, except your friend does it. Write down HIS kills with the gun, shots fired, shots hit, and accuracy.

If your shots hit are near the same, but the kills are different, this is most likely a human problem. You need to work on what you are doing with the gun.

If your shots fired and shots hit AND accuracy are near the same, but the kills are different, this is a gun problem. The gun is sporadic. That means the gun isn't quite the best gun in the world to use.

If your shots fired and shots hit aren't the same, you can either do the math to where it evens out, or just have one of you do it again until they are close.

You don't actually HAVE to do all that (although it is a bit more exact). You can just ask yourself:

"Hey, do I suck with this gun, or does EVERYONE suck with this gun?"

Practical Accuracy is very important. Know your limits, and know the limits of the gun. If there was no practical accuracy, and all that mattered was technical, we'd go around getting needler kills and no scope sniper headshots all day.

Trajectory

This mostly goes with grenades, but the brute shot, needler, plasma pistol, etc. all go along with it. Trajectory = the flight path of a bullet from gun muzzle to target, when considering actual guns. With this it is more than bullets, but, eh.

Trajectory is something you just have to learn, but, if in doubt, just aim a little bit lower than what you'd instinctively do.

Something a lot of avid grenadiers do to help their grenades land where they want is abusing the fact that you always throw grenades at the same speed, and they always go the same distance. Knowing this, you could stand somewhere in a map and know exactly where to aim to get the grenade to go somewhere. The object you look at is called a "marker".

Raise your reticule to a certain place on a map, one far away and distinct enough to where you can always find it. Now throw a nade. If you are standing in that spot, looking at that place, and throw a nade, it will always land there. Use that to your advantage, until throwing a grenade to that spot becomes instinct.

ClICK HERE to Read The Full Post